Monday, 29 April 2013

Introduction to Making Period Costume


  Although I’m not primarily interesting in costume design, my love for all things fashion led me to the discovery of a masterclass – Introduction to Making Period Costume – at Northern Stage in Newcastle Upon Tyne.  The course was led by professional costumier Gayle Playford and the head of Northern Stage wardrobe department Alison Stringer.


Gayle Marie Playford is a designer, supervisor and maker of costume for professional theatre and film productions. She has worked in the costume interpretation industry for over 15 years and embraces collaborations with experts in multidisciplinary arts. She also developed the degree programme Costume Design and Construction at Cleveland Collage of Art & Design. She is currently making the costumes on the BBC1 Drama The Paradise.

The places on the course are very limited – only 10 people per class, but the small numbered group makes the course more intimate and enjoyable. The day began by meeting in the reception of Northern Stage before being greeted and a register was taken – just like in school days! The group was then took to a small conference room, in which we were introduced to everyone as well as being introduced to the schedule of the day. To start the day we were given a presentation on the ‘’Introduction to Making Period Costume’. Along with the PowerPoint slideshow, Gayle and Alison explained various topics found within costume making; such as the different roles within the process of completing a costume project; for example: costume designers, costume makers, costume finishers.

 They explained that a costume designer would have to decide at the very beginning of a project whether or not to create a historically correct aesthetic or a historical interpreted design, the designer would also be in charge of the financial decisions as well as the visual and aesthetic.
 The costume maker would then interpret the designers’ ideas into reality by creating samples, advising on fabrics, timescales, toiles, fittings, etc. The role of finishing a costume could be given its own job title; there are specialists trained in finishing costumes, they would take the newly made garment and use various techniques to ‘age’ the garment to create a historically accurate look, for example make them look dirty, ragged, frayed, worn, etc.


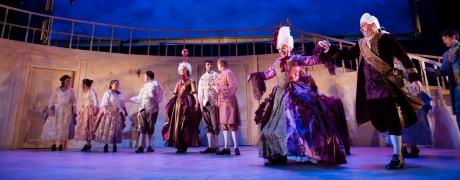
An example of a costume created for a Northern Stage Production

 Gayle Playford then explained the importance of the underpinnings of period costume; the underwear. Historically woman wore a lot of under garments including corsets, chemises, petticoats, caged crinolines, bustles, bum-pads, etc. The combination of the under garments all contributed to creating the overall silhouette of the final garment and outfit worn.  

Gayle then went on to talk about fabric sourcing for period costumes; she said that because of the nature of period costume design heavyweight fabrics are most often used; she said that upholstery fabric can work really well with costume making projects. She also said that it is often cheaper to travel to Europe to buy fabric and bring them back than it is to buy them in this country. Both Gayle and Northern Stage often use a German company – Fukotex, when sourcing period fabrics. Gayle proceeded to show us some of her designs and costumes for The Paradise; displayed in the form of moodboards they showed photographs of finished costumes alongside notes and fabric samples.  To my surprise one of the boards showed a costume made entirely from fabrics sourced from a local fabric shop, First for Fabrics – my personal go-to shop for fabrics! Gayle then went on to say that if not from Europe the fabric she sources are almost always from northern England. She also praised various northern resources for costume enthusiasts such as Manchester Gallery of Costume, Macclesfield Silk Museum, and The Bowes Museum, to name a few. 


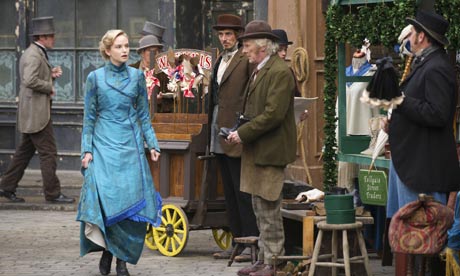
 Blue dress made from fabrics sourced from First for Fabrics seen on BBC1’s The Paradise. 

  After discussing fabrics and fabric sourcing, Gayle then explained different methods of pattern cutting for period costumes; cut/drape on the stand, create pattern from scratch using measurements or use an existing pattern from a book.; she suggested the Patterns of Fashions series by Janet Arnold. There are also some good books to help with creating patterning from scratch using measurements, such as books by author Ron Davis. She explained that the method chosen should reflect the design, for example a Tudor period costume would need to be made using a flat pattern due to its straight shape, in comparison to a curved silhouette which would be best cut on the stand.


 Janet Arnold - Patterns of Fashion

  After the informative presentation we then headed down to the wardrobe department where we would spend the rest of the day. We were then shown various demonstrations of techniques that would be used in the making of a costume; such as tailor tacks, attaching padding/interlining, pleating, pressing, etc. Using some of the techniques we were then giving the task of constructing half (one side) of a ¼ scale 18th Century coat. We were given pattern pieces and two weights of calico – one for the coat and one for the lining, we started making the coat but unfortunately didn’t have time to complete it on the day but hopefully I will finish it at home soon. It was really different working 1/4 scale but it was definitely a good experience, would consider working that way in the future for appropriate projects.


  As a whole the experience was very insightful and enjoyable, the day seemed to go so fast. I would also like to take part in the ‘Pattern Cutting for Theatrical Corsetry’ masterclass but unfortunately the previous classes have always sold out and the next one I can’t make it to! Hopefully there will be the chance to go to one and it would be great to see even more masterclasses on offer – particularly interested in the underwear construction so it would be perfect if a class based on that is created!


 If you’re interested and want to know more; why not book up and experience it for yourself:

http://www.northernstage.co.uk/whats-on/introduction-to-making-period-costume


Thursday, 18 April 2013

Denim...


So you may have seen a much earlier post about a denim project I undertook...

If not i'll quickly fill you in; I looked into the history of Denim and current trends before producing a range of my own designs, I then picked some of my favorite garments to make: Shorts and a Cape.

And after the pattern cutting and making process I made and styled the following...


I'm very pleased with the results of the photoshoot!

I decided to style the shorts with the slightly oversized burntout print black T-shirt to create a more relaxed look; a solid black vest top just looked too dull, I think the sheerness and printed detail adds more interest to the outfit and images. I also added a few accessories to finish the overall look; The long vintage style 'pocket watch' pendant was almost identical to the buttons of the shorts in terms of colour, the floral like pattern was also very similar. I also added a chunky silver bracelet with the same floral like design, and although you can't see it on all of the photographs, I  feel it adds that little finishing touch to the outfit quite nicely. 


I have to admit I was a little nervous for the photoshoot as it was the first time I have done this! 
 And I'm a bit of a perfectionist and really wanted the photos to look good. But after working with the model and photographer, the day was actually quite good and I'm looking forward to more photoshoots in the future.


Monday, 25 February 2013

85th Academy Awards... The Oscars!

As awards season comes to a close; the big one we've all been waiting for has finally occurred, it is of course; The 85th Academy Awards, aka The OSCARS!! 


In terms of Fashion the Oscars never fails to draw attention; with stars making the most important decision of what to wear, possibly the most important event of the year in showbiz (well at least within the film industry)


As there were so many celebrities and so many outfits to be seen; I couldn't possibly blog about them all!
Soo... Here is a very small selection of my favorite dresses that were on display at the awards.


Zoe Saldana

Catherine Zeta Jones


And my Favourite dress of the night goes to....


Jennifer Lawrence 


Wearing a stunning Dior Couture gown. The strapless style beautifully suited the actress, as did the fitted bodice, and full skirt with flowing train (which had actually had 6 inches took off it just before the show!). 

Even a small trip (which everyone seems to be talking about!) on her way to accept the Best Actress award for her leading role in Silver Linings Playbook, couldn't deny the gracefulness of the young actress.


Lets see what the future holds for the ever stylish Academy Awards in the years to come...


Saturday, 2 February 2013

Little Black Dress... Embellished Cape.


The Toile Stage: Continued...

After finding a lighter weight fabric to toile my cape with I was able to continue the process.
 As the calico is quite a heavy and stiff fabric I couldn’t get a realistic toile whilst using it, therefore I created a new toile using a lighter weight fabric, more similar to the georgette I would be using. I cut out my pattern pieces in this lighter fabric. 


 I then sewed the toile together using two side seams an then tried it on the mannequin. This lightweight fabric toile was much better to work with as I could get a more realistic view to how it would look like in my final fabric. The shape looks alright but needed taking in slightly down the sides, but this was just a tiny bit to shave off to take it in slightly to create a better fit.


 Front
Back


The shape of the shoulder didn’t seem to be sitting correctly; with the advice of a tutor, I added tucks or little pleats to lift the sides of the shoulders up slightly. This seemed to work and the shape did look a lot better once the tucks lifted the cape a bit. With the shape and silhouette of the cape sorted it was now time to think about how the embellishment would be placed onto the shoulders.


 Before Tucks
With Tucks


It was suggested to me to embellish directly onto the shoulder pads and then attach the shoulder pads on top of the cape. I wasn’t really happy with this idea as I thought it would simply look like I had just placed something on top of my cape rather than the embellishment being part of my cape. 

To get a better idea of how this suggest technique would look like; I was given an embellished shoulder pad that someone had previously created, I then placed this onto my cape.


 As I had imagined it looks like it has just been place on top rather than it being part of the garment. This process made me even more sure of how I wanted to embellish my final cape; I would place the shoulder pads underneath the cape and then embellish directly onto the cape fabric.


The Manufacturing Stage:

I was happy with the shape of my cape and now knew how I was going to embellish it and therefore it was time to cut out my pattern pieces in the final fabric – georgette. I had to use a lot of pins and a weight to hold the fabric in place because it is so light and moves so much when trying to work with it.


Using a baby overlocker I sewed the side seams of my cape; I used this method rather than a normal or French seam as the fabric is so light and sheer that this is the best possible way to sew the sides with the least impact on the garment visually. I then tried the cape on a mannequin; the shoulder again doesn’t look right and needs to be lifted – as I did with the toile.


  To get a better idea of  how the cape would look on a person – because the mannequin has no arms and therefore the cape would hang differently, I tried it on a real life model. 


After fitting the cape on a model I still believed the shoulders needed lifting slightly; and with countless failed attempts at putting in tucks to do so; I eventually come up with a solution.
  Putting tucks in was much easier with the last toile but for some reason the tuck wouldn’t lie correctly with the georgette fabric – they would either look correct at the front but horrible from the back or vice versa. 

 The solution I came to was to put in a two-point centre back tuck; this lifted and brought in the shoulder really nicely. I also believe that this kind of tuck creates a nice detail to the back of my design. 


With the shoulders and back of the cape all sorted it was time to work out what to do with the front. 

 As I wanted the design of the cape to just sit on the shoulders and hang; I didn’t want or need to create any fastening, instead I decided to tuck the centre fronts underneath the shoulder pads and create a doubled over centre front detail. 
  This solution would create the dramatic look that just sits on the shoulder whilst adding a nice extra touch to the front.


To finish the edges of my cape I used the baby overlocker around the centre fronts and all the way around the neckline, I then measured a length of black satin bias tape to fit around the entire cape edge.

  Before attaching the satin tape, I pressed the whole length in half; once pressed I then carefully placed the edges of the cape into the centre of the folded tape and the edge stitched the tape in place. 

  This process was quite difficult because the fabric moves so easily with it being so light, but after two attempts and very careful sewing I eventually managed to successfully attach the satin binding to create my satin bound edges. 
  
The reason I chose satin to bind the edges of the cape was to help tie the two garments together to look like they were made to be worn together. The satin edges work well with the duchess satin fabric of the dress


With the satin binding attached to the edges of the cape; it was almost time to add the embellishment details, but before that I had to tuck the centre fronts under and tack the shoulder pads in place.


  I was then ready to start embellishing; starting slightly below the shoulder pad I sewed a row of sequins anchored with a black seed bead – this way there would be as little threads visible as possible. Using the shape of the shoulder pads as a guide I sewed the shape I wished to achieve.


  Once I had sewed a few rows; I notice that while I was embellishing the shoulders were lifting even more (which luckily I had anticipated and therefore there would be no problems with the final fit). With the shoulder lifting I thought it would be best to stop and place back on a mannequin; and then by eye I drew a line as to where the embellishment should be on the other shoulder and then started to embellish that side.

   I then decided it would be best to work by sewing a few rows and then alternating to sew another few on the other shoulder rather than finish an entire shoulder then move onto the next. This method worked well for me as I was using 3 different coloured sequins which would create an ombré effect of colours graduating into black. 


 After many long hours of sewing tiny beads onto the cape; I was finally finished embellishing the shoulders! 


I am particularly pleased with the graduating effect of the different coloured sequins, and also the fact that the amount of visible thread was kept to an absolute minimum.  It looks its best when the light hits it; it sparkles and creates a striking dramatic effect which is exactly what I wanted to create.


 All that was left to do now was to finish off the hem; to do so I simply level the hem off by measuring from the ground up to the hem where I wanted it to end, I then placed pins where I wanted the hem line to be and the once I took the cape off the stand I cut along the line created with the pins. 

 With the new hem line levelled and cut; I then simply baby overlocked the entire hem line to create a very small neat looking hem. I wanted a small and simple hem as I didn’t want to take any focus away from the embellished shoulders of the cape and with the fabric being so light and sheer personally I think this is the best way I could have finished the dress.


Throughout this module I feel that I have coped well with the challenges I come across and I am happy with the result of my final garments. I think the dress is nicely fitted and shaped to create a sleek look ; and I think the simplicity of the dress works well with dramatic looking cape. The heavily embellished shoulders of the cape rightfully take focus and look best when the light hits them. I also light the contrast of the soft flowing fabric of the cape with the bold embellishment; I think this creates a lot of interest. I also like how the satin bound edges sometimes can be seen when there is movement, I do think that this helps tie the outfit together nicely. 

  Overall I am happy with the results as the final garments have worked well and look like I had originally designed them.